

A colleague recently recommended to try Hyprland, a dynamic tiling Wayland compositor — particularly timely, as I was planning to install Arch Linux on my old early 2015 MacBook Pro.
So, over the weekend, I decided to give it a go.
I downloaded the latest Arch Linux ISO (2025.05.01) and used balenaEtcher to create a bootable USB stick. The process was straightforward, and I was ready to dive into setting up Arch on ageing Apple hardware.
With the image written to a modest 4GB USB stick, it was time to get started. I plugged in the USB and powered on the MacBook. Once I heard the familiar chime, I held down the Option key to access the boot menu. It took a few seconds for the USB drive to be recognised.
One of my initial concerns was how much trouble I might have getting macOS-specific hardware working properly under Linux. Components like Wi-Fi and audio controllers can be notoriously tricky on Apple devices. But I figured I’d find out soon enough.
Before selecting the USB drive, I connected to the Wi-Fi network directly from the boot menu.
Once connected, I chose the EFI Boot option. A few seconds later, I was presented with the following boot menu:
Arch Linux install medium (x86_64, UEFI)
Arch Linux install medium (x86_64, UEFI) with speech
Memtest86+
EFI Shell
Note: The “with speech” option is designed for visually impaired users.
I selected Arch Linux install medium (x86_64, UEFI), and after a brief wait, I found myself at the command-line interface (CLI).
Before diving in, I checked whether I was still connected to Wi-Fi by running ip addr show. Unfortunately, it showed no connection. A quick look at the iwctl documentation helped me get started.
First, I launched the interactive iwctl utility, then ran device list to confirm the wireless interface was detected. Next, I issued:
station wlan0 scan
Interestingly, this didn’t return output straight away, but running:
station wlan0 get-networks
displayed a list of available Wi-Fi networks.
To connect, I executed:
station wlan0 connect <SSID>
Replacing <SSID> with the name of my network. I was then prompted for the passphrase.
After entering the passphrase, I received a couple of unusual messages:
category 0x5: action 0x4
table err:-52
I turned to my trusty friend ChatGPT for insight.
category 0x5: action 0x4relates to mesh or management frame handling under the nl80211 MLME (Management Link Management Entity) category. Since I use a mesh network, this made sense. There again I could be wrongtable err:-52indicates that a command (like an association or authentication request) failed because the device wasn’t ready or lacked the necessary state/data to proceed.
Despite the messages, running ip addr show showed I had an IP address, and I was able to ping Google successfully — so the Wi-Fi connection was live.
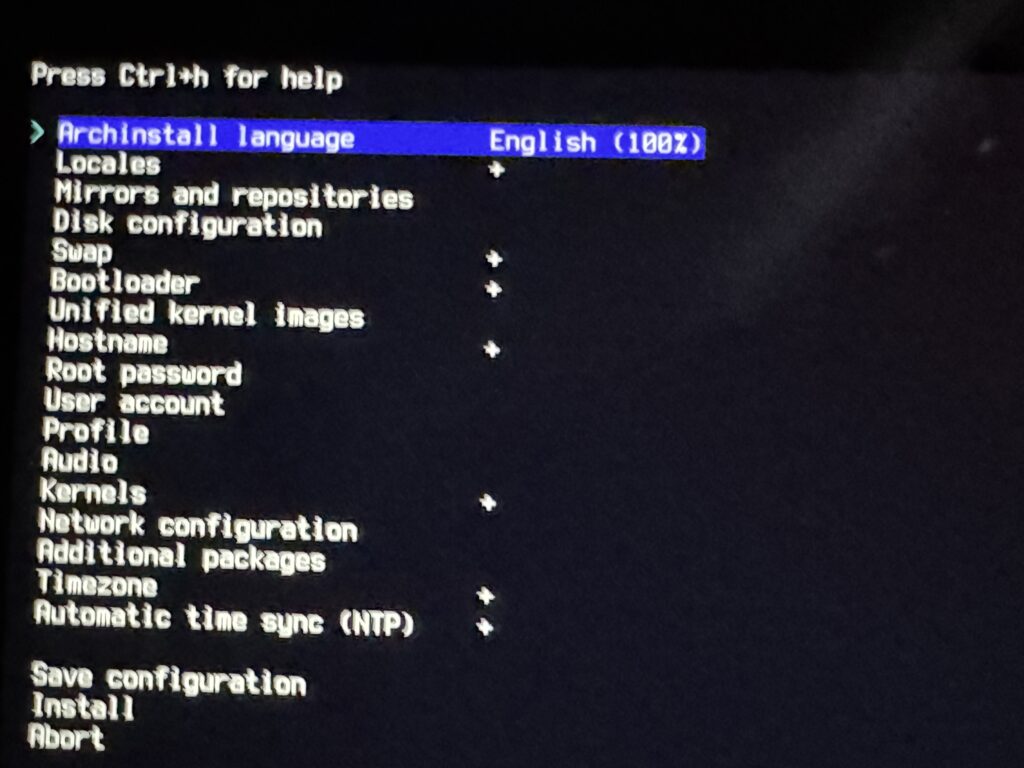
With networking sorted, I returned to the main task: installing Arch Linux. To get started, I launched the guided installer with:
This presented me with a range of configuration options, ready for the next phase of the journey.
archinstall
Let me know if you’d like a follow-up post for the rest of the installation process, including setting up Hyprland!
In Part 2, I’ll walk through the configuration and installation of Arch Linux, followed by launching Hyprland for the first time.
Leave a Reply